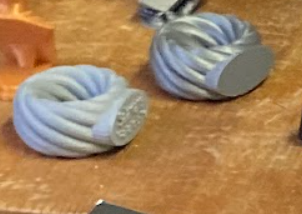
About this 3D model
Description The project is divided into four parts. In the first part of the project, the children will learn what 3D printing is. In the second part, you will learn how to create and edit models. In the third part, he will get to know the 3D printer and start tis Target group focus The goal of the project is to familiarize children with the basics of 3D printing, individual processes in creating a model and operating the printer. The output of this project is a 3D printed turban with the child's name, which can be worn on a scout scarf. We implemented the project with scouts aged 11-15 and we believe that it is possible to implement it with wolf cubs (children aged 7-11), but the leaders must be prepared for more assistance. We took advantage of our regular scout meetings and summer camp. Our project may be suitable for other scout groups and centers. Necessary knowledge and skills The project is suitable for complete beginners, it is designed to guide even a complete beginner through the world of 3D printing and explain everything needed for modeling. For the project manager, it is necessary to have intermediate knowledge in the modeling program Prusa Slicer. Having intermediate knowledge means - being able to add and edit object text in the program. In a 3D printer, be able to change the print speed and the height of the Z axis. Be able to connect finished prints with instant glue and get rid of stringing using a lighter. Project objectives The goal of the project is to familiarize children with the basics of 3D printing, individual processes in creating a model and operating the printer. The output of this project is a 3D printed turban with the child's name, which can be worn on a scout scarf. We implemented the project with scouts aged 11-15 and we believe that it is possible to implement it with wolf cubs (children aged 7-11), but the leaders must be prepared for more assistance. We took advantage of our regular scout meetings and summer camp. Our project may be suitable for other scout groups and centers. Necessary equipment Common 3D printing and modeling equipment, enough filament, instant glue (Roxolid AKTIV-X), lighter/hot air gun (getting rid of stringing on text), 3D modeling program blender if you want a different turban shape. 3D modeling Fasteners Project timeline The time required for preparation is 30 minutes, the total time spent working on the project is 5-6 hours without printing. Phased time estimation: Interpretation and familiarization with the printer 15 minutes Modeling for 10 boys 45 minutes Cleaning prints 5-10 minutes Gluing prints 5-10 minutes Possible exchange of groups with a larger number of children Approximate printing time of one turban at 100% dimensions, infill 10% and 0.2mm SPEED layer height 0.2mm takes 1h 32 minutes. Printing a name tag at 100% infill and 0.1mm DETAIL takes 7 minutes. When the text speed is reduced to 40%, roughly 10 minutes. Workflow Progress in points Introduction to the world of 3D printing in the form of discussion and explanation A sample of prints, failed prints and an explanation of why this happened Getting to know the 3D printer and a demonstration of how to use it Divide into two groups, one goes outside to play something (if there are a lot of children, about 10 or more) and the other goes to start modeling name tags - add text to the model and then edit it so that the text/nickname fits on the model and the height of the text is the same Show the preparation of the printer for printing and the children will start printing the created name tags Demonstration of changing the filament and reducing the speed to 40%, the children change the filament according to the instructions (If the text does not stick to the nameplate, lower the Z axis during the process) Removing from the mat Gluing models Cleaning with a lighter/heat gun Product completion, recap and space for questions Introduction to the world of 3D printing in the form of discussion and explanation Leave room for children to ask any questions during the explanation A sample of prints, failed prints and an explanation of why this happened Getting to know the 3D printer and a demonstration of how to use it Divide into two groups, one goes outside to play something (if there are a lot of children, about 10 or more) and the other goes to start modeling name tags - add text to the model and then edit so that the text/nickname fits on the model and the height of the text is the same ( tall text does not hold) Show the preparation of the printer before printing and the children will start printing the created name tags Demonstration of changing the filament and reducing the speed to 40%, the children change the filament according to the instructions Let the children try the exchange and navigate them if they don't know (If the text does not stick to the nameplate, lower the Z axis during the process) Removing from the mat Wait for the pad to cool down Gluing models Use of instant glue and,