About this 3D model
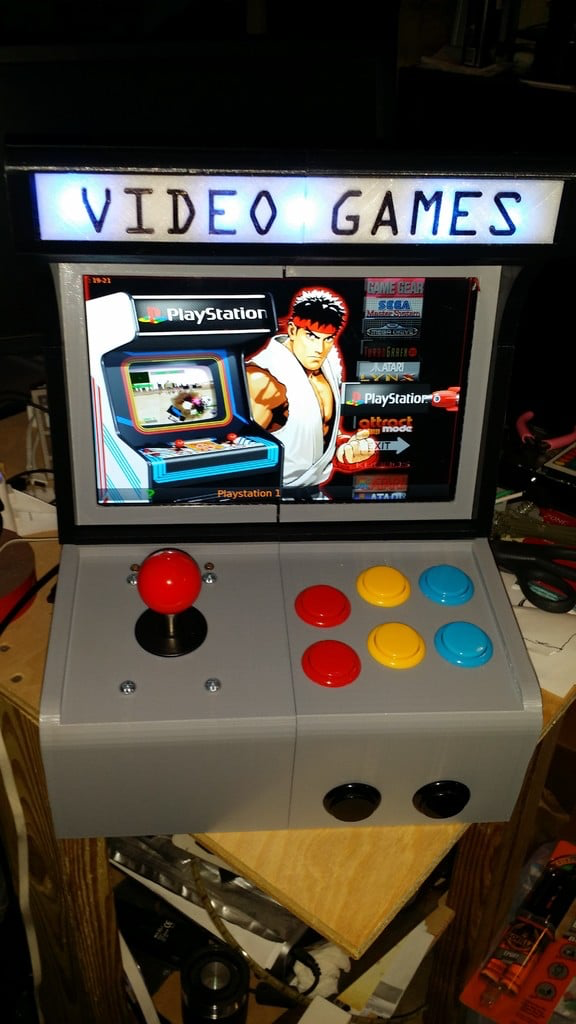
Summary https://www.youtube.com/watch?v=hTGTHzLN20g (UPDATES COMING SOON! 12/29/22!) *Now Battery Powered! 5+ Hour Battery life! Use Boost converter: https://www.amazon.com/Yeeco-Converter-Regulator-Stabilizer-Adjustable/dp/B011EBSKK0/ref=sr_1_3?s=wireless&ie=UTF8&qid=1526397789&sr=1-3&keywords=5+to+12V+boost+converter&dpID=51xw5k2jkoL&preST=_SX300_QL70_&dpSrc=srch Amazon - $7.76 And a RAVPOWER RP-PB41 Battery: https://www.amazon.com/Portable-Charger-RAVPower-Battery-26800mAh/dp/B012NIQG5E/ref=sr_1_1?ie=UTF8&qid=1526397747&sr=8-1&keywords=RP-PB41 More Battery Info: https://www.youtube.com/watch?v=aVNQKss2Bwk Re-Designed 6- Button Layout! This is a ground-up Remix of malopezn's Arcade Cabinet. Found Here: http://www.thingiverse.com/thing:768663 Big Thanks to malopezn for the initial Design, as it saved me a TON of time. For this build I decided to use a Raspberry Pi3, High Def 10" Screen, 6 button Layout, NeoPixel lighting, an Arduino Nano, and a Pimoroni Picade parts kit. This still prints on any 200x200x160+ Prusa or better, and for the most part does not need any support. The Light Frames do need support for the parts touching the Bed plate. So Far I have added the Following to the design: Refit Location for the Raspberry PI 2/3 (Removed B Model Mounting) Added Mounting for the HDMI Screen Controller Board Added Mounting Area for the HDMI Screen Control Board and IR LED New ATX Molex Power Supply Cut Out Added a Cut out to Wire LED Strip into the Cabinet Marquis Inserts for the Cabinet Marquis (White or Clear, Painted Letters, Accented by LED Strips) Added Glue-On Printable Decals (Pac-Style) http://www.thingiverse.com/thing:681851 Refitted to use a Pimoroni Picade KIT (Exact Fit) Speaker mounting added (For Picade Kit Speaker - Exact Fit) Slotted mounting where possible to make fitment more flexible Holes added to Left Upright, to allow LCD driver board screws to be reached easily. 10" Screen frame added. allows you to make the 10" LCD into a more hearty assembly. Switched to Magnetic Mounting for screen, for easy service and card swaps. Possible Upgrades Still to Be Implemented: Nanopixel Illuminated Buttons Sound Reactive Buttons and Marquee On/Off switch for Marquee Portable Lithium Battery Power and Charging (Implemented, See Above!) Coin Slot Trackball or Ergo Trackpad Water or Peltier Cooling for Overclocking the PI. Illuminated Side Panel Decals And So much room for more in this little guy :-) Customize to your hearts desire, All Design Files Included! Build Parts List: x2 Rolls of PLA or ABS Plastic, Plus a little bit of CLEAR for the Marquee. EDIT: Some items are missing now in Amazon, I will Re-link what I can. I have not bought and verified each of these, its just what I could find at the request of someone in the comments. Please do your homework on reviews and make sure you are buying from good sellers. 10" HDMI Screen 1280 x 800 (Non-Touch) 100$ https://www.amazon.com/10-1-inch-Diagonal-Especially-Raspberry/dp/B01JJ60LZE Molex 5 AMP Power Supply - $20.00 + Shipping (Comes with a SATA to USB Kit) https://www.amazon.com/110v-Power-Supply-Molex-5000mA/dp/B002TJNDU4/ref=sr_1_4?s=electronics&ie=UTF8&qid=1526395875&sr=1-4&keywords=molex+Power+Supply&dpID=51sSk3Xx17L&preST=_SX300_QL70_&dpSrc=srch MUST be 2.5a/2.5a (5 Total Amps) or it will NOT be powerful enough to run the PI AND the screen! These are hard to source. One of the above unit should do the trick! Neopixel Type Lights (Any WS2812 Addressable LED works)- ($16.00 - 20$) https://www.amazon.com/Addressable-Sealed-WS2812-30-LED-Strip/dp/B01GYDLJ24/ref=sr_1_10?s=electronics&ie=UTF8&qid=1526396135&sr=1-10&keywords=WS2812+LEd OR https://www.amazon.com/TOOGOO-WS2812-8-5050-Driver-Development/dp/B0757C6X5C/ref=sr_1_13?s=electronics&ie=UTF8&qid=1526396135&sr=1-13&keywords=WS2812+LEd An Arduino Nano v3 Type, or Clone, to Control them with: (3$ - 10$) All Over the Web https://www.amazon.com/s/ref=nb_sb_noss_2?url=search-alias%3Delectronics&field-keywords=Arduino+Nano&rh=n%3A172282%2Ck%3AArduino+Nano Raspberry PI3 ($35.00) All over the Web 64gb Class10 Micro SD Card (20-25$) https://www.amazon.com/s/ref=nb_sb_noss_2?url=search-alias%3Delectronics&field-keywords=Micro+SD+64GB+Class+10&rh=n%3A172282%2Ck%3AMicro+SD+64GB+Class+10 Pimironi Picade HAT Kit - $54.00 Shipped. https://shop.pimoroni.com/products/picade-hat Short HDMI Cable - $10 Average (I had one laying around) Hardware Fasteners! Mix of 1/4" Nuts and Bolts should get you done. (Approx $15) I used x2 hobby bolt packs from the hardware store. Uses x4 Neodymium Magnets to hold the halves together. (Approx $10.00) Magnets are 6.35mm x.6.35mm x 25.42mm N42 Strength. (37 lbs of Pull Force) 1/4" x 1/4" x 1" https://www.kjmagnetics.com/proddetail.asp?prod=B44X0 Glue. I use Loctite go2 Glue. As it Dries Perfectly Clear and is relatively strong. $5.00 http://www.midlandhardware.com/164309.html?gclid=Cj0KEQiAw_DEBRChnYiQ_562gsEBEiQA4LcsssCUvJgLsK9W-IvjbX9tngGxEL68p-Ndi5wT9aKHTpMaAjlc8P8HAQ Also helpful