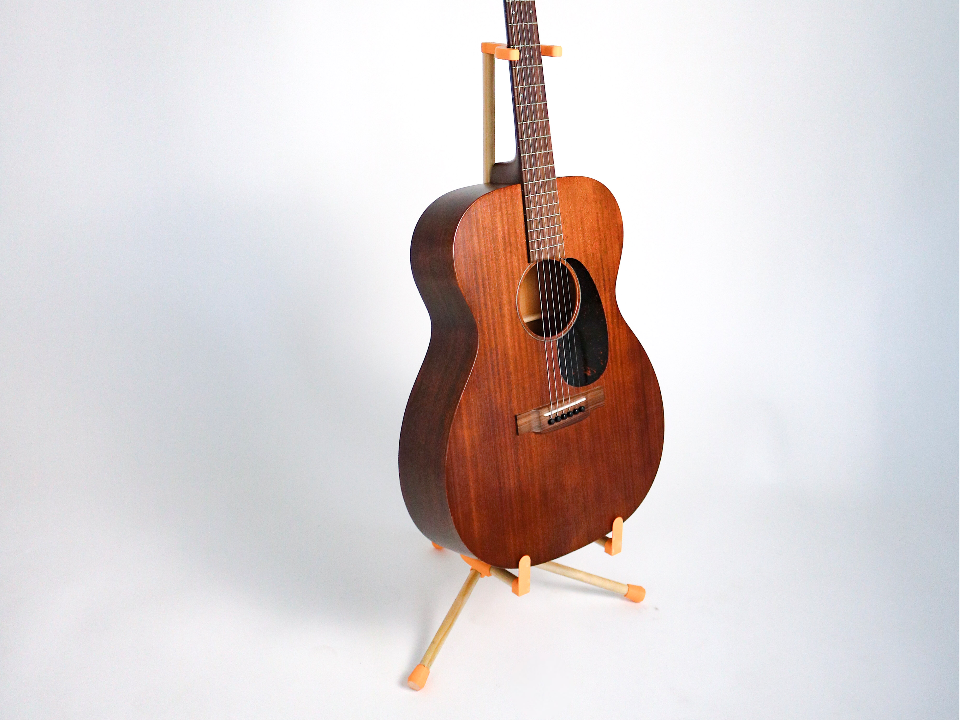
About this 3D model
DIY Guitar Stand. Its made from wood round stock and 3dPrinted parts. OFFIC EHELPER DESIGN CONTEST: Some times the best way to boost productivity is with creativity and a small brain break. stepping back from a problem for a second and focusing else where can have great benefits when you return to the problem at hand. this simple and nice looking guitar stand allows you to keep a guitar colse to you desk for a nice breain break here and there throught the work day. pick away and be productive !!! Premise I live in a small apartment with no garage and not much room for tools, but I love to build stuff so that's kind of a problem. I have been looking into using 3d printing as a means to cut out more complex wood working that would require a big shop. for my first go at this I decided to build this guitar stand. I'm really stoked at how it came out but am mostly stoked to see what awesome ideas come from you guys in the form of comments and remixes! What You Need - 3d Printer and filament (obviously) - at least 8 #4 x 1/2 in. oval head phillips wood screws - Around 58 in of 5/8ths in. thick wooden dowel (I bought the 2 of the 48 in long ones from home depot ) - a saw of some sorts - optional some sort of tape - optional a drill bit smaller in diameter than the threads if a #4 screw DIRECTIONS Its Easiest to start by printing off all the parts. Feel free to print them in any orientation you choose but here is the orientation I printed mine in (I PRINTED EACH ITEM BY ITSELF) I chose to print at 90% infill some of these parts are load bearing and need to be sturdy but also this stand is very light and could use every ounce. print with tree supports!!! - TOP - right side up (same as it appears in the final stand) - MIDDLE - right side up (same as it appears in the final stand) - BOTTOM - right side up (same as it appears in the final stand) - 2 END CAPS- I printed this what the long flat side on the print bed and dowel hole facing up. I printed both at the same time - 3 FOOT STOPS - I printed these with the dowel holes straight up so right side up Disclaimer: get help from an adult when using power tools and the saw. Safety always comes first. Now that that's out of the way lets continue I am going to give you the measurements I cut all my pieces to BUT these may vary based on your guitar! here is what you have to keep in mind STEM the top piece that holds the neck of the guitar is 2 &1/8 in wide at its widest point so your stem size may very based on that. id suggest putting together all the pieces minus the wooden part of the arms. then setting you guitar on the 3d printed "middle" part and measuring at what height the neck of your guitar is 2 in or less and cutting your stem to that size. the shorter the stem the better, if its longer it introduces more flex and less stability into the stand. ARMS If you have a dreadnaught or a fatter guitar the wooden arms might need to be longer, id caution over going more than 5 inches here though. the further away from the base that you shift the weight the less stable it gets. - 2 long legs - 9 in - short leg 9 in - 2 bottom arms - 4in but I may move to 4.5 (READ ABOVE) - 28 in (PLEASE READ ABOVE BEFORE CUTTING) FINE TUNING We want our stands to feel tight and stable, so here are some things to do to achieve that. The short leg is used to control the tilt of the stand. If your guitar feels like it wants to fall forward off the front of the stand you can shorten this leg and make it lean back into the stand more. The bottom arms also control how much lean the guitar has, lengthening these allows you to put the base further away from the stem. BE CAREFUL the stand is light so the further away the weight is shifted the less stable the stand is Fitment. I made everything with a .2mm tolerance but the wood is imperfect and I hate to say it but our machines are too. I used tape to make the pieces fit very snug. this way the 3d printed walls are less likely to flex. NOTE: Don't make the parts too tight because you could split some of the print lines if you're pushing the pieces in too hard. After everything is cut to length and fitted you can go ahead and add you screw! I drilled a little pilot hole so I wouldn't split the dowel and recommend that but if you don't have access to a drill you might be able to make it work without. also iy you can't make it work you could always use tape to make sure the joints are extremely snug. But if you do that there is a risk the parts spin and your guitar falls then. NOTE: The screw on the bottom piece that connects the stem should be facing the guitar. that way the little leg is facing directly away from the guitar. EXTRA NOTES a word of caution, if your print comes out rough or if you just want to be extra careful it may be a good idea to look into adding some kind of padding to the places the guitar touches. this will prevent the guitar from suffering any scratches or unnecessary wear. some ideas I had for this were foam/rubber coverings t