About this 3D model
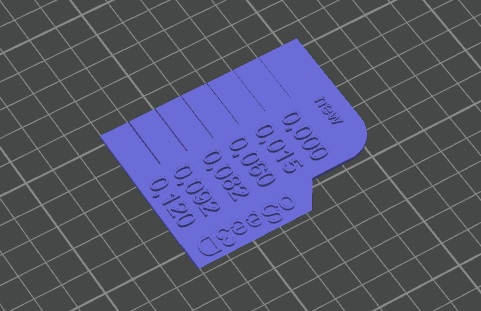
Sprache/Language: Deutsch + English You need the print profile, the STL only will not work. Der Test benötigt das Druckprofil, die STL allein wird nicht funktionieren. English New Version - flow ratio measuring tool Replaces this tool: https://makerworld.com/de/models/22835 This tool is designed as a simple quick test to see if the printer can maintain a gap of 0.1mm with the current settings in the slicer and the filament settings. The topmost gap in the tool corresponds to this theoretical 0.1mm. If you find that the 0.1mm is not maintained, you can determine a correction value for the flow ratio of the filament, as described later in this text. Why is a 0.1mm gap important? Some parts are designed so that they should fit together after printing. If parts are printed without any additional gap, they will not fit into each other directly after printing, or it will be very difficult for them to fit into each other. As the material shrinks, the fit becomes better. Therefore, such parts are designed with a gap dimension. The outer dimension of the part that is to fit into another is reduced by 0.1mm, for example. Sometimes larger gap dimensions are used. It would be a bit too little if you could only read that the current settings do not allow a gap dimension of 0.1mm. The conclusion that follows from this is that the filament flow is probably set incorrectly. That is why values are given on the tool with associated gaps. Application Find the first cleanly separated gap and read off the next value at the bottom right. Subtract this value from the currently set flow ratio of the filament (e.g. 1.06) and you will get a filament flow with which a gap of 0.1mm should be maintained. The result can be checked by printing the tool again. If the gap is still not maintained during the check, simply apply the test again directly as just described. It may be necessary to recalibrate the filament in order to adjust the flow ratio more precisely. But you now know in which range the flow ratio should be in order to print accurately fitting parts. Remember the K-value (dynamic flow calibration) Here you can see how a K-value that deviates by 0.004 can have an effect. The value of 0.034 was determined by manual calibration. The value of 0.038 was determined by automatic calibration. When assessing the light gap, you should also consider whether the filament might contain too much moisture. You should achieve a uniform surface quality with one filament. If the quality on the surface varies, you think that the extrusion has qualitative differences, then remember to dry the filament before printing. In this example the filament should be dried again; it is PAHT-CF. Nevertheless, the determined K-value plays a role. If the K-value is ignored and the moisture in the filament, then in this example 0.015 would have to be subtracted from the flow ratio of the filament to get a clean gap. This would work when it comes to achieving a perfect fit, but it doesn't improve the quality of the external surfaces. The original version of this tool was created using purely theoretical judgement. This second version takes into account some inaccuracies in the CAD design and in the Bambu slicer. I have also investigated some interactions of the settings which have been incorporated into the improvement. The new reading values are due to these interactions. Since the correct print settings are indispensable to achieve usable results, I have listed these settings below. While the first version was printed with basic settings, the new version of the tool requires modified settings. As I save the print profile, all settings should be loaded in Bambu Slicer as listed below. Changes compared to the Pofil "0.20mm Standard @BBL X1C": - Wall lines: 4 Please note: - No smoothing - Wall generator: Classic - 0,4mm nozzle The scaling of the artwork has a decisive influence on the results. Here is the correct scaling: - X-scaling: 100%, size: 75.70mm - Y-scaling: 100%, size: 61.68mm - Z-scaling: 142.86%, size: 3mm If the values are not already entered in the slicer, please enter the millimetre values! Before printing starts the following measures are important: Use the flow dynamics calibration for the filament! If necessary, use the automatic flow calibration before printing (corresponds to calibration of the flow dynamics). With automatic calibration before each print, it is possible that the printer may determine slightly different values for the filament each time, so bear this in mind. However, there should be no reason not to use this automatic calibration before printing, as the deviations here should be small. Be sure to switch on the print bed levelling! This has a decisive influence on the reading accuracy on the printed object. To print the tool 1. load the 3mf file into the Bambu Slicer and update the filaments (synchronise with the AMS if you are using an AMS). 2. Select your printer model, your print plate (not structured plate as PEI) and the f