About this 3D model
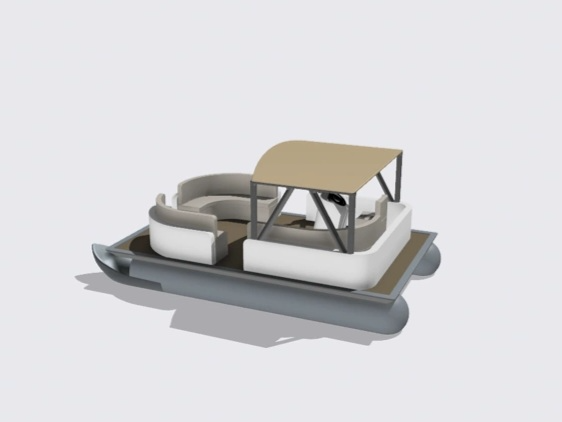
Summary: Tooner is a pontoon boat designed to test the capabilities of your printer while serving as a benchmark for tooning your printer. The boat has several features that you can observe and measure in order to diagnose or tune your printer. First, ensure that your using your slicer’s default settings for a 0.4mm nozzle and 0.2mm layer height. This will be your baseline. After printing the Tooner, you’ll observe and measure the features in order to identify deficiencies and calibrate your printer. Print Profiles: The first print profile is the original model with default settings in Bambu Studio. The second print profile is the 4-color variant. The third print profile is the original model, with optimized bridging in Bambu Studio. If you're looking for a cleanly bridged canopy, use this one. Observe/Measure: After your Tooner is printed, you’ll observe the features for visible defects and measure features to ensure accuracy. The following will list the features and how to utilize them in your analysis: Pontoons: The pontoons are the base of the model with limited surface area touching the build plate. These should be able to print without adhesion issues, but are narrows enough that a poorly maintained build plate/defective filament/printer issues will quickly cause lifting. There's debossed text on the bottom of one of the pontoons that is raised by 0.4mm. At the front of the pontoons is a smooth overhanging curved surface that's notoriously difficult to print and easily reveals surface deviations. The bow of the pontoons begins with a 39 degree angle. Observe the bow of the pontoons for surface deviations which should be clearly identifiable if present. Ensure the body of the pontoon is round. The top of the bow will have layer lines visible where the body slopes into a point. Deck: The deck is bridged across the pontoons, has a raised border (0.3mm above the platform), and is otherwise flat across the entire top surface. The deck front to rear should measure 75mm. Observe the deck surface for a smooth, flat platform. The border should exhibit visible lines with a relatively flat surface. The sloped sides leading to the pontoons should be smooth and free of deviations. Rails/Seating: The railing form uniform curved walls. The two walls on the left and right have a small section of strings designed into it. The rear has more text that is on the vertical plane and debossed by 0.1mm. The two passenger benches in the front follow the curve of the rails. The passenger bench in the rear has a curve that deviates from the rails which have a 5.1mm fillet. The seat cushions overhang the base by 0.1mm. The seating box depth should be 6.5mm. The seating height from the deck to the top of the cushion should measure 5.6mm. The width of the passenger openings in the railing should measure 8.5mm. The backrest height to the seat cushion should measure 6mm. Observe the railing to ensure the corners are smoothly rounded, the vertical surfaces are flat and smooth, the strings are mostly straight, with no strays or broken strings. The seating should be smooth with minimal details and slightly rounded edges. There should be clear distinction between the cushion and backrest. Captains Chair: The captain's seat has a console with a very thin visor, a steering wheel, and a crude decorative pattern on the seat cushion. The angle of the console slope where the visor meets is 10 degrees in relation to the deck. Observe the captain's chair for deviations. The captain's chair should have a very crude pattern on the seat cushion, the console should be smoothly rounded, and the visor should be offset from the edge by 0.1mm and appear smoothly rounded with minimal defects on the rounded corners. The steering wheel should be identifiable, with only minor deviations due to the layers being printed at an angle. Canopy: The canopy consists of 8 poles with a diameter of 1.5mm. The poles start out in 4 groups side by side and separate to distribute across the span at the top. There is a small interface layer that bridges across the poles. On top of that interface layer is the canopy, which bridges from one side of the other. The canopy then has a 45 degree angle in the front and rear and a curved top surface. The canopy should measure 31mm from front to rear. The angled poles are sloped at a 60 degree angle. Observe the poles for deviations near the bottom. These should show a distinction between the bottom of the pole and the point at which the printer is no longer printing the console visor. After that, the poles should be nicely rounded and smooth until about ¾ of the way to the top. At this point, most printers will begin to exhibit some deviations and skew. This is nominal and intended to show differences between default settings and whatever tooning you're trying to achieve. The awning should be crudely bridged across the two sets of poles. I say crudely because most printers will really struggle at this point on the default settings